Followers

Saturday, February 20, 2016

Zentangling in the Secret Garden.....

Hello dear friends: It's been a while since I made one of this cards, I don't know if you've heard of ZENTANGLE, it's the ART of Doodling and it's really fun.  Some 3 years ago, more or less, I saw a card on Pinterest (now there are literally thousands) and it immediately caught my eye and, when something catches my eye I want to try it ASAP so, I bought a book called Zentangle Basics and, when it arrived, I really loved it.  I made a few cards right away, some of my friends received one and they really liked it. This method of doodling could be time consuming, specially if you doodle on small spaces but, it's relaxing and there is no wrong way, anything looks great. So, when I saw the challenge over at Color Q , where they ask to use Basic Black, White and one Spot color, I immediately grabbed my Zentangle book and went to work.
Here is my card.


I stamped the big flower of the retired SU Secret Garden stamp set onto a panel of Canson watercolor paper with Stazon Jet Black ink and proceeded to doodle, I follow some of the designs on the book but others are my own. The spaces on the petals are small but, after covering each one of them, you can still see the flower image, can you?  I used THIS ZIG memory marker to do the fine lines and designs.
The challenge asks for the use of one color so I picked Tempting Turquoise for the butterfly from the SU set called "Best Thoughts" that I bought on Ebay. The sentiment is from my unknown stash.
Here is a close up of my doodling.


I had to use a magnifying glass I use for cross stitching to be able to fill in those tiny spaces.
Here is a picture of the finished inside.


The little butterfly is from a retired SU set called "Every Moment" and the sentiment is from the Power Poppy set called Simply Camelias, a gorgeous stamp set I actually won by participating in their January challenge with THIS CARD.  Right now, the February challenge is going on over at Power Poppy , they love it if you use one of Marcella Howley's images but, if you don't have any Power Poppy stamp sets yet, you can participate with any stamps for a chance to win a free set of your choice, so I hope you give this challenge a try.
This is the banner that inspired my card.

Thank you for stopping by today, until next time, happy stamping.
Hugs from Maria.

Friday, February 19, 2016

Boy, Oh Boy!!!!!

Hello everyone: I have a card to share with you today that was so much fun to create, mainly for the fabulous focal image. I'm linking this card to the Curtain Call challenge, with a theme of "BOY", and the SIP (Stamp, Ink, Paper) sketch challenge and the LiveLoveCards masculine challenge. Here is my card.


Masculine cards are specially hard for me to make but, cards for teen boys.....well, that is even harder!  I saw this image on the Mo Manning digital store one day and it immediately captured me, this could very well be the photo of my 15 year old grandson, sitting in my living room, playing football or space invaders and stuff like that, with his "sustenance" by his side, LOL!! 
I really don't like to buy digital images, my printer sometimes acts up and I don't know how to size the picture to make cards so, I went to see if there was a rubber version of it and, YES!! there is so, of course I bought it.  This image is called Video Boy and it's also available in RUBBER .
I colored it with Prismacolor pencils and paper stumps dipped in baby oil, I really love how the colors blend so easily.  The pattern paper is from Lili of the Valley, the sentiment is from Power Poppy's Sassy Succulents .
I just love this young boy's expression, his untied sneakers, his hair all messy, the concentration and grin on his sweet face, just so beautiful. 
As in all masculine cards, there can't be to much "bling" or ribbon and bows so all I added was a button and a very inconspicuous linen thread bow. I changed the sketch just a bit by moving the line to just under the picture, I really didn't want to cover any part of this image, I truly hope it's ok.
Here is a picture of the finished inside.


Again, not to much stuff, just a simple sentiment and a balloon. Here are the banners that inspired this card.

SIP Sketch Challenge 35 800
Thank you for stopping by, until next time, happy stamping.
Hugs from Maria.

Thursday, February 18, 2016

Merry Monday meets "Less is More".....

Hello everyone: I've said it before, I love it when I can combine challenges with one card and this time, I'm thrilled to show you this card I made for two of my favorite challenges, Merry Monday , with a theme of "Berries" and "Less is More" , the challenge is "One Layer Cards", here is mine.
This is the second card I enter to this challenge. You can see the other one HERE if you'd like.


This image is from a super old Flourishes set called "Naturally Merry", I stamped it onto a 4"x51/2" card base with Memento Jet Black ink an colored it with my Prismacolor pencils and paper stumps dipped in baby oil. The sentiment is from the same set and its heat embossed in gold.
Here is a picture of the finished inside, both the sentiment and the branch are from the retired SU set called "Beauty of the Season", they are stamped with Hello Honey Ink.


Here's the banners that inspired this card.


"Less is More"
ONE LAYER CARD CHALLENGE.
The Designer Team at "Less is More" is having a Designer Team Call. I don't have enough experience with this style of card making, although I love it and I'm getting the hang of it but, if you have the know how, go check this out. 
Here are the pictures of the retired stamp sets I used so you can see how they look like and maybe be lucky enough to find them. This first one has been LOVED  a lot!! that's why I took the picture by the window. Brr!! 
Thank you for stopping by, until next time, happy stamping.
Hugs from Maria.

Wednesday, February 17, 2016

Think Spring!!!!!


swimbikerunandstamp: Think Spring!!!!!:

Hello everyone: I'm just about ready for the Winter to be over, as I get more.....err.....more "mature", the cold months seems to just drag and drag along and in the mean time the majority of us, are stuck indoors, looking out our windows to our barren and snow covered flower beds, hoping that soon, the firsts signs of renewal and rebirth, will start peeking out of the frozen ground to delight us with color and beauty. So, when the CASology challenge announced the Cue Word for this week was EGG, my mind went immediately to Easter Eggs and this sweet image from Lili of the Valley.


I stamped this image onto a panel of Canson water color paper with Stazon Jet Black ink and colored it with the aqua painter and SU markers, I added some grass to it with a teeny stamp from Art Impressions. I sponged a bit of Broken China distress ink around this ducklings and their mom to give the scene some depth. Then I embossed this panel with the retired SU Tulip Frame embossing folder, that is it, I didn't want to stamp a sentiment here, I felt it would disturb the main image, instead, I stamped the greeting inside.


This sentiment is from the dollar bin at my local craft store and the Daffodil is from a retired Flourishes set called "Signs of Spring". 
Here are a couple of pictures of this sets.
I buy unmounted rubber stamps if they offer them, I just trim the excess rubber and put some double sided tape in the back to stick them on the MISTI or acrylic blocks, I get the best impressions all the time, like with photopolymer stamps, only this are not clear.
Here is the Cue Word for this week's CASology challenge, hope you will give it a try.


Thank you for stopping by, until next time, happy stamping, hugs.

Hand Knit with Love.....

Hello everyone: I have another card to share with you today to link it up to the Mojo Monday sketch challenge this week. The image was stamped and colored last week and it was waiting for the time to use it on a card, the Mojo Monday sketch gave me the perfect sketch for it. Here is my card.


The image is from a retired Flourishes set called "Stitched for You", I stamped it on a piece of SU Whisper White card stock using Memento Tuxedo Black ink, colored it with my Prismacolor pencils and I die cut it with the retired SU Windows Frames Collection Framelits then did a bit of paper piercing with the SU paper piercing pack. I sponged it with Baked Brown Sugar ink.
The beautiful pattern paper is from Lily of the Valley.
Here is a close up of this pretty yarn, hope you can see the Wink of Stella on it.


Here is a picture of the finished inside.


Both the sentiment and the image in the corner are from this set.
This is the sketch that inspired this card.


And here is the picture of this beautiful stamp set.

Thank you for stopping by, until next time, happy stamping.
Hugs from Maria.


Tuesday, February 16, 2016

One Layer Card with pencils.....

Hello everyone: One of the things I've learned participating in CAS challenges is to really enjoy this beautiful style of card making. The first few times I attempted to make CAS cards I struggled with leaving all that white space, adding very little or no embellishments at all and to keep my hands and work area free of ink or anything that can "dirty" my paper.
Most of you know how much I love water coloring, I'm no expert by any stretch of the imagination, I just enjoy this technique and I've learned a few tricks along the way but this time, I use only Prismacolor pencils to color this image.
The "Less is More" challenge for this week is ONE LAYER CARDS!!!!! and you must include an image with a stem. Here is mine.


This is a beautiful and sadly retired image from Flourishes called "Orchids"
Now, I wanted to enter this challenge but I ran out of Ninah Solar White card stock, I have a few pieces left here and there but not enough to make a card base and fold it in half for the One Layer challenge.  I thought of going out yesterday but the cold and snow just kept me indoors so I had to improvise and hope for the best.  So I grabbed just a plain white card base that I buy in bulk to make my cards and, bracing myself, I stamped the image with Memento Tuxedo Black ink hoping that I wouldn't smear when I colored it with my Prismacolor pencils and paper stumps dipped in baby oil, no water coloring this time and I had to be real careful not to use to much oil because I didn't want to stain the back of the card. There is really nothing to add to this image, it's just so beautiful all on it's own, all I did was stamp the word in SU Rich Razzleberry ink.
Here is a picture of the finished inside, the sentiment is from the same set, the little Terrarium with the Orchid on the corner is from another Flourishes set called "From the Garden", both are stamped with Rich Razzleberry ink.


Here's a picture of the stamp set I used, just so you can see how it looks like and maybe you can find it too. 
Thank you so much for stopping by, until next time, happy stamping, hugs from Maria.

WWW means.....

WARM WINTER WISHES......Hello eveyone: It's time for a new challenge at the Retro Rubber challenge blog.  It's still Winter on most of our Country and up here in the North, there is snow on the ground.  I don't like the cold months anymore, I'm a bit older now so playing in the snow, building snowmen, having snowball fights is a thing of the past.  Now, I only like to see the snow from inside my house, I love it when everything is covered in it, glistening with the first rays of the sun, it looks lovely.
The theme at Retro Rubber is WINTER and here is the card I made for it.


This images are from a very old, retired Flourishes stamp set, I've had this set for at least 2 years. I stamped the images onto Canson water color paper with Stazon Jet Black ink and colored them with the aqua painter and SU markers in Old Olive, Cherry Cobbler, Bashful Blue, Chocolate Chip and More Mustard. I added some Wink of Stella to the snowman and Dazzling Diamonds to the snow and the mittens. I punched the Holy leaves with a super old McGill punch I got from the dollar bin at my local craft store. 
The SU Cherry Cobbler Ribbon is from my (never ending) stash and the red Rhine Stone is retired SU.
The pattern paper is from Lily of the Valley, unfortunately they retired all their paper, I was lucky enough to grab some of their last 8x8" pads, I love the designs on this beautiful paper and one of the great things about it is that it's NOT double sided, I could never bring myself to condemn this sweet Holy and Berries pattern to eternal obscurity.
Here is a close up picture so you can see the shimmer of the Wink of Stella on this sweet Snowman.


And here is a picture of the finished inside.


This sentiment, the one in front and the little snowflakes are from this set, they are stamped with Archival Brilliance pigment ink in Pearlescent Sky Blue.
Here is the banner that inspired this card.


I hope you give this fun challenge a try and join us at the gallery, we would love to see what you create.  Please stop by at the other Designer Team's blogs to be inspired by their creations. 
Thank you so much for stopping by, until next time, happy stamping.
Hugs from Maria.


Monday, February 15, 2016

Out of my Comfort Zone.....for the Pals.....

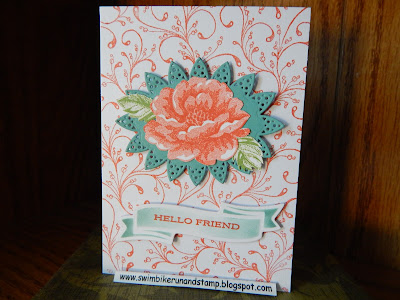
Hello dear friends: This is my second post today, the first one was finished yesterday and scheduled to post this morning. But this new one is for The Pals Paper Arts Color Challenge.  I'm a bit late posting this card but, my friend Katy McGloin is the host so, even if color challenges are a bit difficult for me, I wanted to give this one a try. Here is my card.


I used an old and retired SU set called "Stippled Blossoms" and stamped my flower onto a piece of Ninah solar white card stock with Calypso Coral ink, the leaves are stamped with Old Olive ink, I paper snipped and glued them to a Lost Lagoon piece of card stock that was die cut with one of the dies from THIS Spellbinders die set. 
The background was stamped with Calypso Coral ink using a background stamp from Impression Obsession, the sentiment was stamped onto a die cut banner with Calypso Coral and sponged with Lost Lagoon ink.
Here is a picture of the finished inside.


Here is the color banner that inspired this card.
PPA-287-Feb11
This are the products I used to create this card.
Thank you so much for stopping by today, please be sure to come back tomorrow because the Retro Rubber Challenge Blog has a new challenge, so I hope you guys give it a try. Oh, by the way, I'm a spanking new member of this fabulous Designer Team, this group of ladies are just the sweetest and patient gals, specially to an old gal like me.
Until next time, (tomorrow, ok?), happy stamping, Hugs from Maria.

Muse Inspiration.....

Hello everyone: I have a card I to share with you today for the Muse challenge, our Muse this week is Anita Bowden , I'm also entering the Ellibelle's Creative Moments Let's Color Linky Party 3,"Anything goes with something colored" challenge.  Here is my card.


I embossed a panel of Ninah Solar White card stock with a Cuttle Bug Music Notes embossing folder then, I stamped one of the images of the Power Poppy stamp set called Countryside Bouquet Delux , onto a piece of Vellum with Stazon Dove Gray ink and colored it on the underside with SU markers in Tempting Turquoise, Bashful Blue, Old Olive and More Mustard. I added a bit of highlights and definition to the petals with a Prismacolor pencil #P901, Indigo Blue. I die cut the word Joy with THIS Penny Black die set called "Love and Joy". 
I attached the Vellum with glue dots and placed a light blue Rhine Stone to cover the dot.  The butterfly is a sticker, I thought it's colors would compliment the flowers and the simple design very well.  


Here is a picture of the finish inside.

The frame is from the retired Flourishes set called "Country Charm", I seem to grab this frames a lot, I just posted THIS card on February 12th., I love the beautiful design on all 3.

This is the Muse card that inspired mine.

I hope you give this challenges a try. Thank you for stopping by today, until next time, happy stamping. Hugs from Maria.

Sunday, February 14, 2016

Unleash your Joy.....

Hello everyone and a very Happy Valentine's Day!!!!! to all of you, on this day of Love and Friendship I'm just thrilled by the amazing friends I've met through this wonderful craft and my blog, on my Journey as a card maker and, I thank all of you, from the bottom of my grateful heart and I send warm hugs and my love, across the miles, to each and everyone of you.
I have a card to share with you today that I finished yesterday but I'm posting it right now, while hubby is fixing our Valentine's Day breakfast. Here it is.


No coloring this time, just some die cutting the little butterflies with a retired SU Embosslits called "Beautiful Wings" and gold heat embossing the sentiment from a retired Flourishes set called "Country Charm Labels".  I scored my Lilac card stock on the diagonal and glued the butterflies on each corner. Here is a close up of the gold embossed sentiment.


And a picture of the finished inside.


The sentiment is from another retired Flourishes set called "Beauty Within" and it's stamped with SU Wild Wasabi ink. The butterfly in the corner is from a SU Hostess set I got on Ebay called "Best Thoughts" and it's stamped with Wisteria Wonder ink.
I die cut the sentiment with the smallest die on the Spellbinders set called Decorative Labels 8 .
I'm linking this card to the following challenges.


Just Add Ink Just Add "V" challenge #298, I chose to add the color Violet.

Just Add Ink

And here are some pictures of the retired products I used, I figured that, if I include this images maybe you guys can look for them knowing what they look like.
Thank you for stopping by, until next time, happy stamping.
Hugs from Maria.