Followers

Monday, October 8, 2018

Hand Embossed Vellum.....

Hello everyone: I love Vellum, I love how it softens an image or a background and it also adds a touch of elegance to handmade cards.
I have an old Pergamano kit I bought a long time ago that has some really pretty patterns to emboss on Vellum or Parchment Paper so I decided to create a card following one of these patterns and hand emboss a piece of Vellum, so here is my card, hope you like it, I will play along with a few challenges at the end of this post.


I just die cut a piece of Vellum with the Wonky Stitched die set and carefully traced the images and the sentiment with a white gel pen, then, I went over each with my stylus, flicking the edge of the petals to get that white effect and retracing the outline of all of the images.
Then I added some color to the back of the Vellum with some Prismacolor pencils.
I attached the Vellum with glue dots to a panel of black card stock and added some Rhine Stones to cover them, I also added gold ones to the centers of the flowers.

**************************************************************************

This is how the INSIDE of my card looks like.


The edge is stamped with the retired SU set called "Delicate Details", the sentiment and the flower on the corner are from a The Ton set called Beautiful Day.

I'm playing along with the following challenges.


Seize the Birthday


Always Happy Birthday October Challenge
Always Happy Birthday

Happy Little Stampers


Sunny Day Crafting "Must include an animal" I included a butterfly.
Sunny Day Crafting

Thank you for stopping by, I always read every single comment you so kindly leave on my posts, I want you to know I appreciate them more than words can express.
Until next time, happy stamping.
Hugs from Maria.
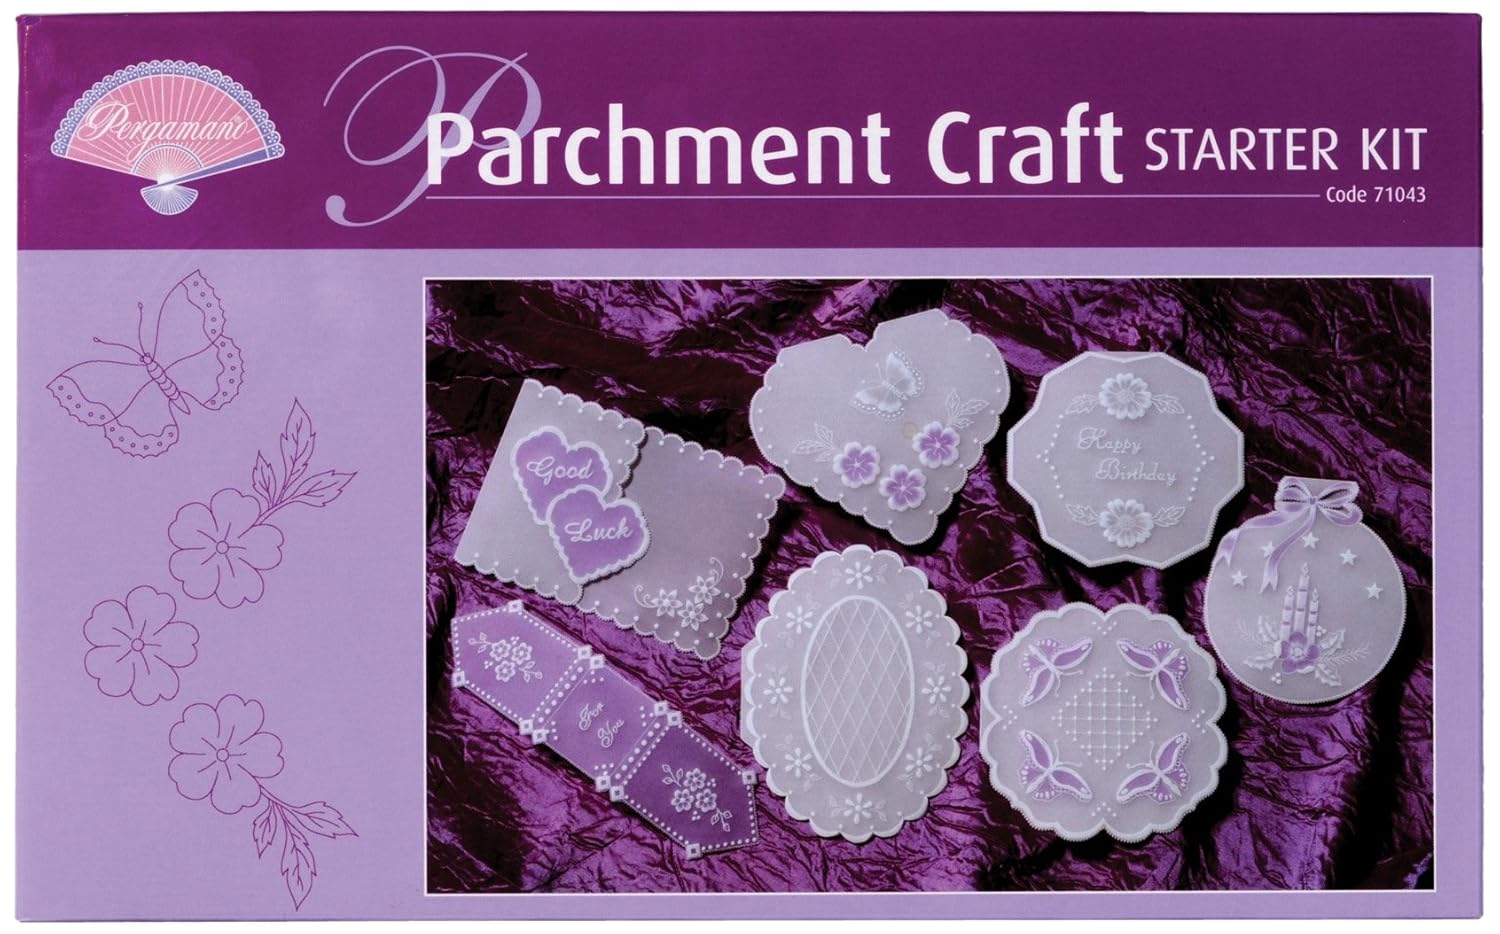
Image result for pergamano kits

This is the kit I bought a few years ago, I tried to look for it again but the two Amazon sites, one in Europe and one here in the USA lists it as CURRENTLY UNAVAILABLE.
I apologize for not giving this information when I posted this card.


Thursday, October 4, 2018

Just add Sparkle.....


Hello everyone: This month of October we at THE FLOWER CHALLENGE are celebrating our second Anniversary, I can't believe that it's been already 2 years since this challenge blog, that celebrates FLOWERS was created by the totally talented Aileen Ryan and Vivien Hodge.  It's been quite a ride, full of fun, support, love, care and patience, I'm one lucky, lucky gal having all of these wonderful ladies to work with.
My teammates and I want to thank all of you who have participated in our challenge for the last 2 years, we hope you'll continue to play along with us this year.
I also want to thank my amazing teammates, they are incredibly talented, kind and generous, it's a privilege to be in their company.


So, to celebrate THE FLOWER CHALLENGE second Anniversary, we want you guys to add SPARKLE to your cards, the more sparkle the better.
Here is my card and I hope it will inspire you to come and play along with us in our gallery.
We have a surprise for the lucky winner that I'm sure you'll love so, get your glittery goodness ready, create something sparkly and come to join the fun.


This is an image from the Power Poppy set called POINSETTIA. I stamped it on a die cut panel of water color paper with Versafine Black Ink and clear heat embossed it, I colored it with SU markers, I added some shimmery Rusty paint to the little fruits and using a glue pen, added some light green glitter to the flower.  I truly hope you can see it, it's really hard to photograph the sparkle.
The die cut is from Spellbinders and it's called A2 Tranquil Moments

******************************************************************

This is how the INSIDE of my card looks like.


The border on the top is from a retired SU set called "Delicate Details", the sentiment is from the Poinsettia set and the small flower from another Power Poppy set called Merry Littles.

So I hope you come and join my teammates and I and help us celebrate our second Anniversary.
Please remember to make FLOWERS the focal point in your cards.
Please add our challenge banner to your post when you add your cards to the gallery.
You can participate in 6 other challenges only.
No back linking.
Only new work, please.

Thank you for stopping by, I always read every single comment you so kindly leave on my posts, I want you to know I appreciate them more than words can express.
Until next time, happy stamping.
Hugs from Maria.


Wednesday, October 3, 2018

Halloween Already!!!??

Well, it's true, October is here!!! Where did the year go??  I love Autumn and all that comes with it, from the cooler temperatures to the magnificent colors and, of course, HALLOWEEN!! 
So I'm sharing this card that will be added to my considerable stash of "spooky" greetings ready to be sent out.


The image and the sentiment are from a Power Poppy set called Feeling Fall.  I stamped them with Versafine black ink and clear heat embossed them and colored them with SU markers, then I embossed a panel of rusty card stock with a retired SU folder, (I forget the name, I apologize).

**********************************************************************

This is how the INSIDE of my card looks like.


Both the sentiment and the gorgeous spider are from a retired SU set called "Dark and Dreary"

I'm playing along with the following challenges.

The Paper Players with a Tic Tac Toe by LeAnne
I went with the middle horizontal line, ribbon, pumpkin and any embossing.

Animal Friends Challenge #67 October "Autumn or Halloween"
Animal Friends Challenge

Unicorn Challenge #37 "Autumn or Halloween"
Unicorn Challenge Blog

Paper Minutes Challenge #557 "Watercolors"

Thank you for stopping by, I always read every single comment you so kindly leave on my posts, I want you to know I appreciate them more than words can express.
Until next time, happy stamping.
Hugs from Maria.


Tuesday, October 2, 2018

Pearls for SOS.....

Hello everyone: The new challenge over at SHOPPING OUR STASH is PEARLS, love this little treasures from the sea.
This is my card that I  hope will inspire you  to come and play along.


The embossing folder is a super old one from Stampin' Up!  I don't remember the name but it's beautiful, as you can see.
I just embossed a panel of white cardstock with it and then, colored it with Picked Raspberries and Shabby Shutters distress inks.  I added the pearls to the center of the flowers.
Most times, I stamp several images and color them just to have them at hand, it saves me lots of time because I go to my box where I keep this images and, if the theme of a challenge calls for one or I need one to fill in a space, I have it ready to go. 
This image and the sentiment are from an old Flourishes set called "From the Garden".

************************************************************************

This is how the INSIDE of my card looks like.


The border on top is from a retired SU set called "Delicate Details", the sentiment is from a Power Poppy set called Everything's Even Rosier, the little flower on the corner is from a retired SU set called "Stippled Blossoms".

I hope you stop by the SHOPPING OUR STASH challenge blog to get more inspiration from my teammates' creations and then, come and join us in the gallery.

I would like to play with the following challenges.

Dream Valley Challenges #187 "PEARLS OR GEMS"

Scrapbook Stamp Society Challenge #150 "Anything Goes
An option of embossing, wet or dry.


Thank you for stopping by, I always read every single comment you so kindly leave on my posts, I want you to know I appreciate them more than words can express.
Until next time, happy stamping.
Hugs from Maria.


Tuesday, September 25, 2018

Let's Smoosh, Shall We?....

Hello dear blogging friends: Well, I must confess, I've never used the SMOOSHING TECHNIQUE BEFORE, but there is a first time for everything and the SHOPPING OUR STASH has giving me and all of you, the chance to try this fun and easy way to do a color wash background.
You can use your panel in which ever way you want, I chose to make a couple of pretty Christmas Ornaments and a Christmas card to add to my nice stash of Holiday cards.
Here is my card, I hope it inspires you to come and play along with us in our gallery.


I used THIS VIDEO TUTORIAL by Loll and CASE'd THIS GORGEOUS CARD she made, I'm in love with this fabulous technique.
I grabbed a panel of Watercolor paper that is nice and kind of thick to be able to absorb the pigment and keep it. I used distress inks in Mermaid Lagoon and Seedless Grapes and followed her directions, I was really pleasantly surprised at how easy and how beautiful it came out.
Then, I grabbed a couple of Snowflakes from a box of left over die cuts and glue them to the ornaments and then, applied a nice, thick layer of Glossy Accents all over the surface.  
Here are a couple of pictures of how beautifully shiny they look.


I then added some silver thread and placed them on the panel with dimensional foam.

***********************************************************************

This is how the INSIDE of my card looks like.


The border is from a retired SU set called "Delicate Borders", the sentiment is from a Power Poppy set called POINSETTIA and the little snow flake from a Penny Black set called "A Bright Tomorrow"
So I hope you go and Shop Your Stash and come and join my teammates and I at the SHOPPING OUR STASH gallery, there you can check out their awesome creations.

I'm playing along with the following challenges.

Allsorts Challenge Week #486 "Water or the color Blue"

Craftyhazelnut's Christmas Challenge  #404 "Anything Goes Christmas"

Hiding in my Craftroom Challenge #371 "Any Holiday"

Sweet Stamping "Dies or Punches"

Crafty Catz Challenge, "Anything Goes/Optional Theme "Let's do Christmas"

Thank you for stopping by, I always read every single comment you so kindly leave on my posts, I want you to know I appreciate them more than words can express.
Until next time, happy stamping.
Hugs from Maria.


An Apple a Day.....

No automatic alt text available.

Hello dear crafting friends: There is a super fabulous sketch over at the RETRO RUBBER CHALLENGE created by the also fabulous Claire Grantham for you to play with so, grab your OLDER THAN ONE YEAR stamps, get busy an come and join my teammates and me in our gallery.
Here is my card and I hope you get inspired to play along.


The image is from a super old Stampin' Up! set called "Feathered Hope", the wood blocks have a date on the decal that says 1998!!!!!  WOW!! that was waaaaay before I even entertain the idea of stamping, heck.....it's the year my granddaughter Vanessa was born so, I was totally and completely absorbed in caring for her while her mother went to work.
So, through the wonder of Ebay and while browsing one morning, I saw this set, in pristine condition and very reasonably priced so I pounced on it without a second thought, I'm now the joyful owner of this gorgeous set, it makes me happy to stamp the images and color them, I love it.
The pattern paper behind the image is from a retired line from Lili of the Valley, the wood plank paper is from a collection called WOOD EFFECT from a company called MODA SCRAP.
The designs on this paper are gorgeous and, to my absolute delight, they are ONE SIDED!!!!!
WOO HOO!! I just couldn't possibly pick a side to put under, I just couldn't.
The sentiment is from a Power Poppy set called Simply Camelias, the little brad from my stash of super old Stampin' Up! embellishments, I don't remember from what year they are.

***********************************************************************

This is how the INSIDE of my card looks like.


The sentiment is from another Power Poppy set called ***** and the little birds are from the SU set.

I know that almost all of you guys have stamp sets that are OLDER THAN ONE YEAR and the RETRO RUBBER CHALLENGE is the perfect place to give those beloved and maybe a bit forgotten sets a chance to get inked up again and shine, WE LOVE OLD STAMPS.

So I hope you go dig out your older sets and come and play along with me and my awesome teammates in our gallery.

Please read OUR RULES, they are few and simple, the most important one is that at least one of the stamps you use on your cards MUST BE OLDER THAN A YEAR.

I will play along with the following challenges.

SUO Challenges #208 "Nature/Fall"

Cards in Envy "Feels Like Fall" Challenge.

Crafty Cardmakers Challenge #218 "Autumn Colors"

The Cutie Pie Challenge Challenge #127 "Shades of Autumn"

Make My Monday Challenge #80 "Autumn/Fall Colors"

Thank you for stopping by, I always read every single comment you so kindly leave on my posts, I want you to know I appreciate them more than words can express.
Until next time, happy stamping.
Hugs from Maria.

Saturday, September 22, 2018

Without the Glass.....

Hello dear blogging friends: The fabulous Power Poppy Blog has a fun challenge for us to play with in the month of September, it's called HITTING THE BOOKS and it's very appropriate for this month since every kid, young and old, went back to school.
I made this card using the Power Poppy set called UNDER GLASS, I just didn't use the beautiful glass bell this time.


This set has 9 fabulously beautiful images to stamp on their own or put under a glass dome, either way, they are awesome.  I stamped my image on a piece of Blick Drawing Paper with Stazon Black ink and colored it with Prismacolor pencils, the die cut is from the Spellbinders die set called "Majestic Oval 25", I die cut a piece of lavender card stock with the Wonky Stitched die set, I love the combination of any purple color and green.

**************************************************************************

This is how the INSIDE of my card looks like.


The sentiment is from a Power Poppy set called Dynamic Duos: Foxglove and Ranunculus and the little succulent from another Power Poppy set called Sassy Succulents.

I'm playing along with the following challenges.


A Vintage Journey September Challenge "Back to Nature"
A Vintage Journey

Moving Along With The Times

Thank you for stopping by, I always read every single comment you so kindly leave on my posts, I want you to know I appreciate them more than words can express.
Until next time, happy stamping.
Hugs from Maria.